AutoLoader User Manual
AutoLoader is an efficient way to edit many files sequentially inside Photoshop. It handles all the tedious file management tasks required to move between images, allowing you to focus on the work at hand.
Once you have set your options using the efficient graphical interface, AutoLoader will open the files you specify into Photoshop, one after the other, with a single keystroke. It can load either an entire folder of files, or only those you select in Bridge. It is both workflow efficient and resource efficient, and will save you hours of time.
Installing AutoLoader
Refer to the Installation Manual for steps on how to install AutoLoader.
Using AutoLoader
The files that AutoLoader loads are determined either by supplying it with a folder (which will load all files in that folder) or using Bridge to select the files you want to load.
In both cases, using AutoLoader is a two-step process. The first step is to configure AutoLoader and the second is to actually start using it.
But before we get to that, let’s assign a keyboard shortcut for AutoLoader Next.
Assign a Keyboard Shortcut
The core purpose of AutoLoader is to speed up your workflow, and you don’t want to have to hunt through your menu system every time you’re ready to move to the next image. So let’s assign a keyboard shortcut and give AutoLoader some real legs.
- Open Photoshop and click to open the keyboard shortcuts window.
- In the dropdown beside select
- In the assignment area, click the small triangle beside to expand the options.
- Scroll down in the list until you find . Click on it and a small entry area will appear beside it. This is where you enter the keyboard shortcut. I use F5, so in the little entry box I would hit the F5 key. You can use whatever you want, but in the interest of speed I suggest a single key rather a combination of keys.
- Click to save your keyboard shortcut, and to close the window.
- Done.
Load Files from within Photoshop
When you have a folder containing a bunch of files you want to process through Photoshop one by one, the easiest way is to set up AutoLoader within Photoshop (not Bridge). Here’s what to do.
- Launch AutoLoader Set by selecting in the Photoshop menu system. This will load up the configuration window shown below:
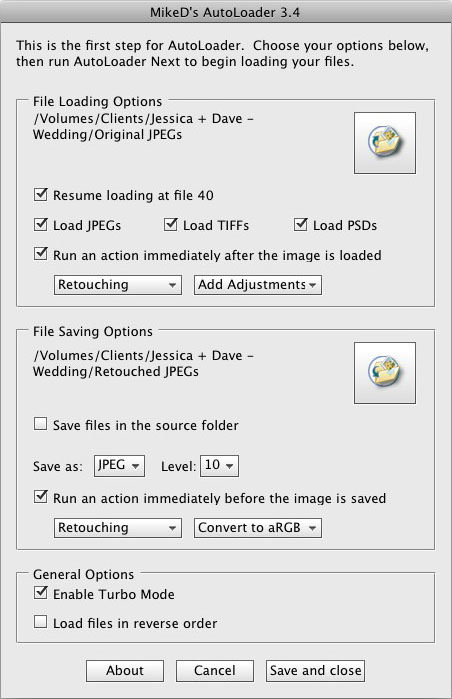
There are three sections that need to be set up: The File Loading Options, the File Saving Options and the General Options. A lot of this is self evident and each one has a tooltip with help if you hover over the label, but here are some tips anyway.
- If you have run AutoLoader on your source folder already, and you decided for whatever reason to stop and come back to it later, Resume loading a file x allows you to pick up where you left off. If no previous run was detected, this option is not selectable.
- If you and another editor are retouching the same group of files at the same time, *Load files in reverse order* is just what you need. User One selects this option, and User Two doesn’t. In this way, User One’s files are loaded top-down, and User Two’s files are loaded bottom-up. This eliminates double-editing, and you simple stop when you get to the same file.
- An action can be run at two strategic spots: right after the image is loaded, and right before the image is saved. Use the dropdowns to select the actions to run. For example, I like to have a particular tool open each time I have a new file come up, so I created an action to select that tool. This way, no matter what I did on the last image, the next image always starts with the same tool selected.
- Turbo Mode can be use to significantly decrease load times. It caches the files list when AutoLoader Next is run for the first time. It’s usually safe to leave this on.
- When you’re done, select to write the configuration files, and you’re ready to begin!
- Hit the keyboard shortcut you set up earlier (in my case, F5). Presto: the first image opens. Edit it to your hearts content. When you’re finished editing, hit F5 again. Presto! AutoLoader saves your file using the settings you chose, closes the file, and opens the next one.
That’s it. Keep hitting F5 (or whatever your shortcut key is) to move to the next image in the queue. Easy as pie. When you reach the end of the list, AutoLoader will let you know and will offer to delete the config files it created.
Using AutoLoader with Bridge
Using Bridge to select the files to AutoLoad is super handy when you don’t want to process an entire folder of files, only a few of them. For example, when I make a blog post for a wedding, I use Bridge to select the files I want to post, then send them to AutoLoader. There are two easy steps.
- In Bridge, select the files you want to process.
- In the Bridge menu system, select
This will open Photoshop (if it’s not already open) and then open AutoLoader Set. Configure the settings, and when you’re done, select to write the configuration files, and you’re ready to begin!
Just like the previous chapter, hit the keyboard shortcut you set up earlier (in my case, F5) and watch as your first selected image is loaded. Edit it to your hearts content. When you’re finished editing, hit F5 again. Presto! AutoLoader saves your file using the settings you chose, closes the file, and opens the next one.
That’s it. Keep hitting F5 (or whatever) to move to the next image in the queue. Easy as pie. When you reach the end of the files you selected in Bridge, AutoLoader will let you know and will offer to delete the config files it created. You should do this to avoid problems with future runs of AutoLoader.
Tips when using Bridge with AutoLoader
- The AutoLoader Set window will change slightly to indicate that you are loading files from Bridge: the source folder and file type selections in the General section is replaced with a label indicating the number of files sent from Bridge.
- If you select files in Bridge that are not JPEG, TIFF or PSD files, they will be silently dropped from the selection before being sent to AutoLoader.
- The files are loaded in the order they appear when sorted alphabetically, *not* in the order you selected them.
