SmartMark User Manual
SmartMark requires some initial configuration of a few action steps, but once it has been set up, it’ll run without you having to think about it again. Here’s how, along with some other helpful info.
What is SmartMark?
It’s important to understand what SmartMark is and isn’t before you get started. This helps later on when you’re designing your actions.
SmartMark was designed to work in complete harmony with whatever system you use for adding watermarks. It does this by saving its configuration within an action step. So once you create this step, it’ll always work with your current setup, as long as that setup is either an action itself, or can call one.
How it works
When SmartMark is run, it analyzes the currently active layer (which should be your watermark) and determines the lightness of each pixel underneath it. Anything less than 50% lightness is considered “dark,” and the rest are considered “light.”
The percentage of pixels considered “dark” is calculated and compared to the threshold value you set in the user interface window. If the percentage calculated is less than your threshold, the dark action is run. Otherwise, the light action is run.
What’s Included
In addition to the script itself, SmartMark comes with three actions to help get you started. These actions are collected in a set called SmartMark.atn, which you can install by double-clicking. You’ll almost certainly want to edit these actions to suit your particular logo BTW.
The Dark and Light Actions
I include two actions that you can use as a starting point. The Dark action does a few things:
- uses a layer style to set a black colour overlay
- adds a very faint light outer glow
- sets the opacity of the logo to 70%
The Light Action does the following:
- uses a layer style to set a white colour overlay
- adds a very faint dark outer glow
- sets the opacity of the logo to 33%
These are all values that I have found work well for my watermark; you can of course change these to suit your needs. In particular, the outer glows are a matter of personal taste.
Keep in mind that these two actions can do anything, including scrapping the current logo layer and inserting a custom logo for each case. This is useful if you have colour in your logo, for example. This flexibility is exactly why I designed SmartMark as a step in watermarking rather than a total watermarking solution.
The Watermark Action
I also include the action I use to apply my watermark to my photos. This is provided as-is and will need editing to, at the very least, load your logo and not mine.
A full treatise on action editing is more than this mere manual can encompass, but in general you can edit a step by simply double-clicking it and making your changes. For more details on editing actions, Google is your friend.
How to integrate into your existing action
If you already have an action and you’d like to use SmartMark with it, bravo. This is what it was designed for. To do this requires some one-time mods to your action to set it up, and then you never have to do it again. Here’s how.
- In your action, we are looking for one of two steps:
a) a “Flatten” step, or
b) the “Save,” “Save As” or “Export” step.
Remember that SmartMark needs to run on the unflattened file with the logo layer selected. So if you see a “Flatten” step, we want to run SmartMark just before this step. If there is no flatten step, we want to run SmartMark just before the Save/Save As/Export step. - Select the action step BEFORE the Flatten or Save/Save As/Export step.
- Click Record (thte button with the dot at the bottom of the action screen)
- Select File, Automate, SmartMark
- In the window that opens, select your Dark action, and your Light action.
- Select “Do It.” This will run the action, and will insert your settings into the action.
- Click the record button action to stop recording.
- Done. The next time you run your watermark action, SmartMark will also run.
Breakdown of the included watermark action
I’ve included a watermark action to get you started. This is the action I use with my photography business, and positions the logo on the bottom center of the photo, like this:

Here is the breakdown of what this action does.
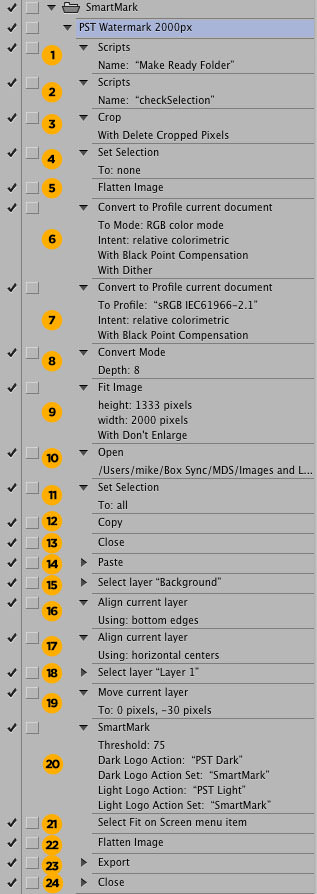
- This is a script that creates the output folder if it doesn’t exist already. You can find it on my freebies page. Optional.
- This is another freebie, this time doing a select all if no selection is made. Optional.
- Crop, in case one was selected by hand. If not, the select all done in step two effectively makes this step moot. Optional.
- Deselect. Optional.
- Flatten the image, in preparation for our logo insertion.
- The first step of making the file web-ready. Convert to RGB colour mode.
- Second step: convert to the web-default colour space, sRGB.
- Convert to 8-bit mode in case you have 16bit images.
- Fit the image to a 2000px x 1333px box, my preferred web size.
- The next few steps handle the insertion of the logo. First I open my logo file…
- …then select all…
- …copy it…
- …and then close the logo file. This take me back to the photo.
- Paste the logo file.
- The next few steps reposition the logo using the align tool. This tool needs at least two layers, and the logo just pasted is the first. This step selects the background layer as well. (Note: the background layer was created when we flattened the image in step 5).
- Align the bottom edge of the logo to the bottom edge of the photo.
- Align the horizontal centers of each layer. At this point, the logo is centered left-to-right and aligned to the bottom of the photo.
- Select the logo layer only…
- … and then move it up a bit, which I did using the move tool and the keyboard.
- Here is where SmartMark was run
- This is a step that fits the image to the screen.
- Flatten the image.
- Export the file using Save for Web to the folder created in step 1.
- Close the file without saving.
Tips for using SmartMark
- SmartMark operates on the currently active layer at the time it is run. So make sure the las thing you do before running it is to select the layer containing your logo/watermark.
- Logos with transparency work best.
- SmartMark can be called multiple times on the same file if you have a complex or multi-part watermark.
