This manual will explain how to install AutoLoader, Proofmaker, Contest Preppie, Sloppy Borders and SmartMark.
Some plugins have an optional Bridge component in addition to the required Photoshop plugin, and installation steps for Bridge are described below too. Just keep in mind that as handy as the Bridge part is, it isn’t required for full functionality. It’s just a helper.
Installing into Photoshop
Photoshop is where the action takes place, so we’ll start with that. Installation instructions are the same for all version of Photoshop
Photoshop requires manual installation of the needed files in order to run. Here’s what to do.
- If open, close Photoshop.
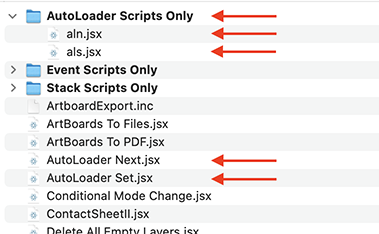
- When you extracted the downloaded ZIP file for your script, a bunch of folders were created. Look in the folder called Photoshop (All Versions) and you will see two files and one folder. For example, for AutoLoader you’ll find this:
- A file called AutoLoader Set.jsx
- A file called AutoLoader Next.jsx
- A folder called AutoLoader Scripts Only
- Copy *everything* (the file(s) and the folder) to the Photoshop Scripts folder. Overwrite what’s there if you’re asked. The default location for this folder is shown below.
Windows: C:\Program Files\Adobe\Photoshop 2024\Presets\Scripts
Mac OS X: Applications/Photoshop 2024/Presets/Scripts (authenticate with your password to permit the copy if asked)For example: here’s how the folder should look after you’ve copied everything into place for AutoLoader:
- Restart Photoshop and you’re good to go.
C:\Program Files\Adobe\Adobe Photoshop 2024 (64 Bit)\Presets\Scripts
and
C:\Program Files (x86)\Adobe\Adobe Photoshop 2024\Presets\Scripts
If this folder doesn’t exist, go ahead and make it, being careful to get the folder names exactly as they appear above.
Installing into Bridge
The main engine for the plugins resided in Photoshop, but there is an optional Bridge plugin that lets you manually select files and send them on to Photoshop for further processing. It requires a bit of manual copying to work properly, but it’s pretty easy. Here’s the scoop.
All Versions
- When you extracted the downloaded ZIP file for your script, a bunch of folders were created. Look in the folder called Bridge (all versions) and you will see a single file called AutoLoader Bridge.jsx. This is the file you will be copying.
- Now that we have the file to copy, we need the folder into which it will be put. We’ll get Bridge to open this folder for you by following these steps:
- Open Bridge
- Open the Bridge preferences window
- On the left side, choose
- Click the button called (Windows) or (Mac)
The correct folder will now be open. Copy the AutoLoader Bridge.jsx file into this folder.
- Restart Bridge and you will see a message asking if you’d like to enable the extension. For example, the AutoLoader warning looks like this:
 Click (in Windows, click ) and the script is ready for use.
