Content Aware Watermarking
SmartMark does one simple thing: it determines the lightness of the area under your logo and, using this information, calls one of two actions: if the area is mostly light, call a dark action. And if the area is mostly dark, call a light action. And just like that, you can automate your watermarking jobs instead of babysitting them. Genius.
The problem with dumb watermarks
Watermaking images has always been an important part of protecting your work online. This is especially true as new ways of sharing images come along that strip away your original context and all meta data (I’m looking at you, Pinterest and Facebook).
There are a zillion ways to apply watermarks, but they all suffer from the same problem: visibility. If you have a dark logo it looks great on light backgrounds, but disappears on dark ones. Light logos look great on dark backgrounds but are practically invisible on white.
So what do do? Add a border to your logo? Or an outer glow? Or maybe you go as far as I used to do by putting the logo on its own background (this is the most common method of getting around this problem)? Or even by creating a border around your images and putting your logo there. All viable of course. But inelegant. And I loves me some elegance.
Lucky for you there is a better way, and SmartMark is it.
SmartMark to the Rescue
Detailed instructions are found here, but the gist of it is this:
- Create an action to change the look of your logo when you want it to be dark;
- Create a second action for when you want your logo to be bright.
- Modify your existing watermark solution to include a call to SmartMark after your logo has been applied, or use the included (and very well documented) watermarking action.
From that point on, whenever you run your action you’ll get a SmartMark, not just a watermark.
Examples Please
Here is what I mean. Here are 100% crops of my watermark applied using SmartMark. Notice that, in each case, the logo has been adapted to suit the lightness of the image underneath it.


Cool right?
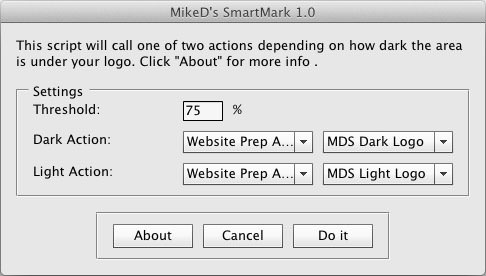
Look See
Controlling SmartMark is dead simple. Because the hard part is in the code, not the interface.
A few FAQs for you
Will this replace what I use now for watermarking?
It will if you want it to, but it doesn’t have to. It is intentionally designed to work with pretty much every known way of applying watermarks. I include the action I use for watermarking to get you started if you don’t have a process already, but here’s the takeaway: if your current process for applying watermarks is a) an action, or b) can call an action before your image is flattened, SmartMarks is for you.
Why didn’t you make it a complete watermarking plugin?
Because there are already a ton of them, and they all do the same thing. And it’s not necessary. Actions are sufficient for placement if you know how to do it. And I do. And since I include my watermark action with your purchase and document it heavily in the manual, you will too.
How difficult is it to set up?
Installation is a snap, and there are detailed usage instructions too. You’ll have to know how to modify an action to get the most out of SmartMarks, but it’s not really that difficult.
Will this work with Lightroom?
Nope. Lightroom doesn’t have the smarts for SmartMark, and its watermarking routine doesn’t offer the ability to export to PS for processing.
We’ve got you covered
SmartMark is compatible with any Windows PC or Mac running Photoshop versions CC, CC (2014), CC (2015) or CC (2017). It’s that simple. Both 32bit and 64bit systems are supported.
It comes with an installer to make sure everything is put in the right spot, and the installation manual spells it all out for you in case you get stuck.
